I've always used Dip-N-Etch etching fluid to etch my beads but recently it has become near-on impossible to get hold of here in the UK and getting it sent from abroad is mighty costly. I'm not totally sure why UK people have stopped selling Dip-N-Etch. Etching fluid contains some potent chemicals and potent chemicals are never a brilliant thing to be faffing around with. I've never had a problem or an accident using Dip-N-Etch in the dozen years I've been making beads, but a quick Google will deliver you many a forum thread about how evil it is, or might be. Royal Mail also recently tightened up their prohibited items list and they're very fussy about sending things like batteries and nail varnish so I'm guessing they wouldn't be too happy about carrying parcels which contain chemicals that can eat glass. I guess it's a mix of chemicals and postal rules that have resulted in Dip-N-Etch becoming as rare as fish tits in the UK.
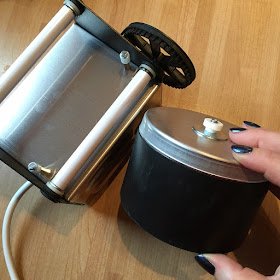
To tumble-etch beads you need a tumbler. Mine is a very basic one from Electric Tumblers. I opted for their 'Home' tumbler motor base (£77.50) and a 510g rubber barrel (£29.95). You can get plastic barrels, which are cheaper than the rubber ones, but from what I can gather, they are prone to leaking and they also make a lot more noise.
You will also need some silicon carbide grit. I'm using 800 grade and I got a 500g container of it from eBay. This is a lot and it'll last me for yonks, so do be aware that you can buy smaller quantities if you'd prefer. Amanda at Mangobeads sells silicon carbide grit in small quantities. She's also written a fantastic article about silicon carbide and its uses in lampworking. I highly recommend having a read of it.
Silicon carbide grit ranges from coarse to very fine. The higher the grade number, the finer the grit. Coarse grit will give you a rougher finish on your beads so if you like to make beads that look like ancient relics, or if you like a lot of texture, opt for a coarser grade grit. For a really smooth, satin finish you will need a much finer grade - 800 or 1000 are super duper.
Then you'll need some kind of tumbling matter that will actually tumble about in the tumbler and rub the abrasive silicon carbide against your lampwork beads. I got a big bag of cheapo 6mm Czech glass beads from eBay.
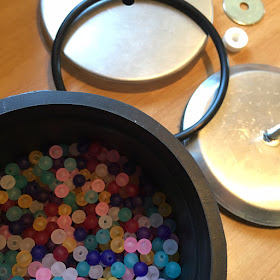
I filled my rubber barrel just over halfway with the cheapo beads. (I'm not being rude by calling them 'cheapo beads'; I'm doing it to distinguish them from my lampwork beads. If I keep saying 'glass beads' I might confuse the situation.)
I then added one tablespoon of silicon carbide.
Next I added the lampwork beads for etching. I selected a few from my Lonelies jar and cleaned any bead release out of their holes. Notice how these are all round and smooth with no sculptural or raised bits? This is because the tumbling matter has a limited reach. Those cheapo glass beads aren't going to get into nooks and crannies and creases and dimples. Sure, you could use smaller cheapo beads but I think you'd have part-etching issues, which of course could be used to an advantage from a design point of view. It's all a matter of personal taste.
Put your lampwork beads into the barrel and add enough water to just cover the contents. Add one drop - one single tiny drop - of washing-up liquid. I don't know why the washing-up liquid goes in. I expect there's a scientific reason. Maybe it's because jewellery makers who use stainless steel shot in their tumblers when tumbling metal use washing-up liquid, so we just think that we have to put washing-up liquid in all tumblers? I don't know. I can't think of a logical reason but hey, it can't hurt and it feels exciting and sciencey to add a single drop of the stuff to the mix, so go for it. (Just one drop, mind. Not a big squirt like you're doing the washing up after a Christmas dinner, or your tumbler barrel will end up foaming at the mouth.)
Put the lid on your barrel, do it up all nice and tight and set it on the tumbler. I left Boy George going for five hours.
I fished my lampwork beads out with the spoon and put them into a plastic tray. My advice is to make a note on a post-it of how many lampwork beads you put into the tumbler, and stick the note nearby, so you'll know how many beads you're looking for.
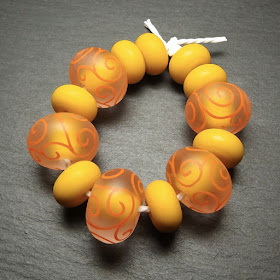
I then washed the lampwork beads in soapy water, rinsed them off and dried them. Ta-dah! Satin smooth, ever so touchable, very nice to feel, "Oh I say, peachy-soft bead, do you moisturise, darling?" tumble-etched beads.
If you compare the before and after lampwork bead photos, you can see that the white bead with a metallic spiral has changed to a white bead with a not-metallic spiral, so bear that in mind if you're thinking about etching metallic glasses. Some beads look better un-etched but some lend themselves to it perfectly, like my 'Mango' Luminobeads.
Because the dye from the cheapo beads came off, I rinsed them, cleaned out the barrel and put them with new water and silicon carbide for the next tumbling, but you don't need to change the solution every time. Just keep the tumbling matter in the barrel and change it after a few tumble sessions.
If you already have an electric tumbler that you use for jewellery making, make sure you use a totally different barrel for any tumble-etching.
I think that's about it. If you've got any questions, please leave them in the comments.
EDIT: If you've found this post useful or interesting, you might want to read my blog post about 'Beadswax' which is an oil and beeswax mixture that I use to finish my tumble-etched beads. It gives them a lovely soft glow.


Dear Laura,
ReplyDeletethanks a lot for sharing!! Hopefully I find a machine like that in German<.
many greetings
Petra
I'm sure you'll be able to find one.
ReplyDeleteGlad you found it helpful, Petra.
Laura :)
It's great to see the before and after photos - I love the 'etched' look on glass beads and it's fascinating to see how you can do it at home.
ReplyDeleteI only tumble metal jewellery (so far!) and I know exactly what you mean about making a note of how many pieces go in - I've also taken to threading pieces on one piece of metal so they're much easier to fish out - not sure if you'd be able to do that with the beads by threading them onto string of some kind, but it's a hint that's saved me a lot of time!
It did cross my mind about stringing them but I was worried they'd knot up and end up bunched together and not etching properly. I don't know; maybe I'll try it. :-)
DeleteI have so far only tumbled metal, and I only string when beads are very small… otherwise they do stick together too much. Maybe if you string on wire and knot the wire between beads it will work better; I’m going to try.
DeleteThank you for this article. I doubted whether to buy a Lortone tumbler or just or stay with the chemical stuff. You made it very clear for my, so today I bought my tumbler ☺
ReplyDeleteHow long do you run the tumbler?
ReplyDeleteAnna
Thank you, just what I was looking for!!!
ReplyDelete