Showing posts with label how to. Show all posts

Wednesday, 14 September 2022

Looking after your jewellery

Looking after and cleaning handmade jewellery

I enclose the following information with jewellery that I sell but I thought I'd put it here for reference.


Looking After Your Jewellery

When you’re not wearing your jewellery, keep each piece in a plastic grip seal or soft fabric bag. Store in a dark place. This will reduce the chances of your jewellery tarnishing and keeps it from getting scratched or tangled. Handle your jewellery carefully and keep it away from perfumes, lotions, hairspray, household cleaners and chlorine.


Cleaning Your Jewellery

• Plated Metal Jewellery

If your jewellery is zinc alloy, brass or pewter with a silver, gold, rhodium or antique copper plated finish, dip a soft cloth in some lukewarm dish-soapy water and then gently rub your jewellery with the cloth while keeping it submerged in the water. Dry the jewellery with a clean cloth, or allow it to air dry.

• Pure Copper Jewellery

Pure copper tarnishes over time but this can look lovely so you might not want to clean it. If you do, add a teaspoon of salt to some white or malt vinegar, or lemon juice, and soak your copper jewellery in the mixture for a minute or so. Remove the jewellery from the solution and then rinse it with cool or lukewarm water. Do not use very cold water or hot water as this could potentially shock the glass and cause it to crack. Dry the jewellery with a clean cloth, or allow it to air dry.

• Sterling Silver Jewellery

Sterling silver can be cleaned in the same way as plated metal. If it is heavily tarnished you can use a sterling silver cleaning solution or special silver polishing cloth. These are available in supermarkets and jewellers.

• Surgical or Stainless Steel

This beautiful metal only gets better and shinier with age and wear. If you do need to clean it, follow the instructions for cleaning plated metal.


IMPORTANT: Never clean jewellery that contains glass beads using the boiling water, bicarbonate of soda and tin foil method, as you might shock the glass and cause it to crack.

Tuesday, 13 September 2022

Making a shimmy bracelet

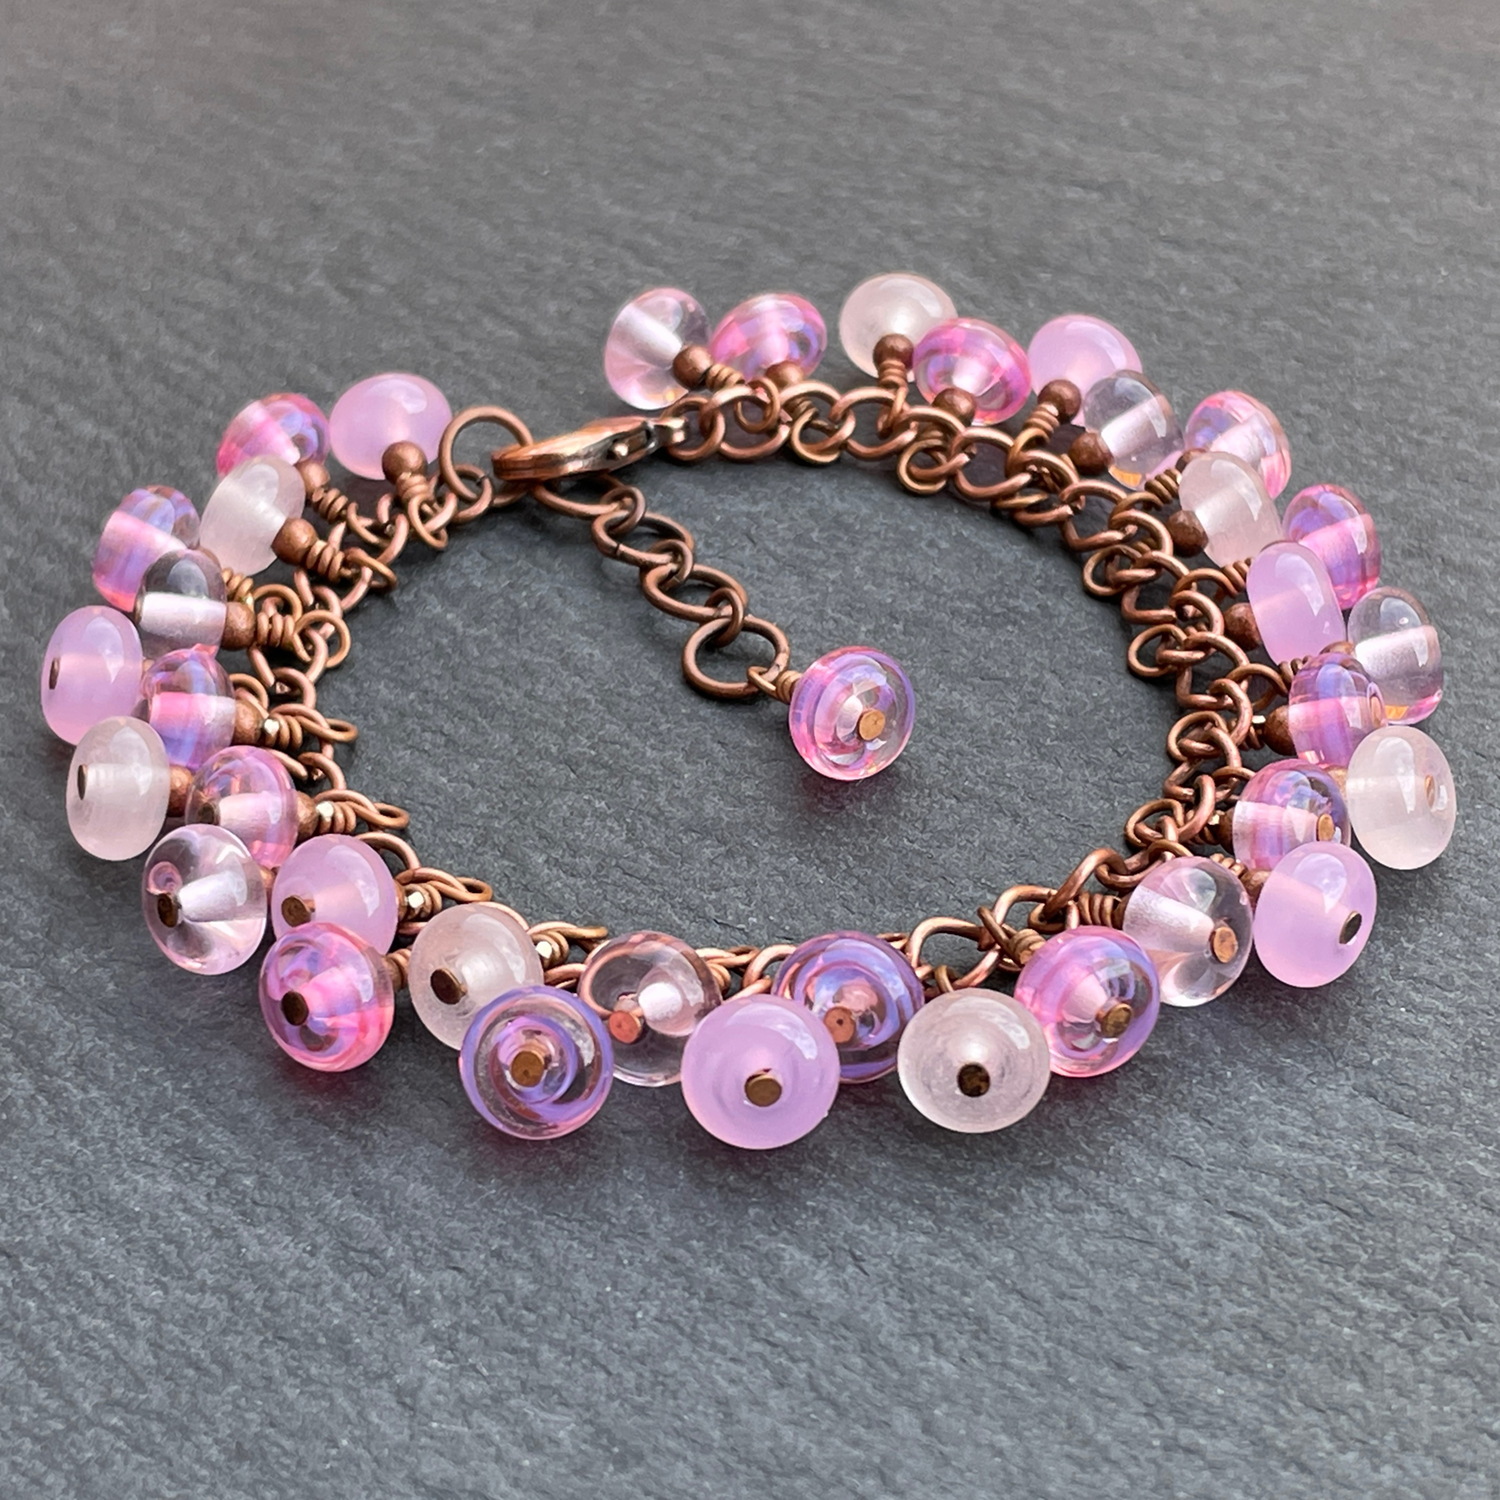
Handmade lampwork glass bead bracelet by Laura Sparling

I thought I'd show you how I make one of my shimmy bracelets. Obviously this is just a chain with beads attached to it so it's really nothing fancy or revolutionary but I've made many of these over the years and I wanted to show you how I've streamlined the process to make quite a long and repetitive task a little bit faster.

I've watched many Adam Savage videos and he's very methodical in his approach to making and assembling. Although I'm not creating movie prop replicas or costumes like Adam does, I have picked up many helpful tips and pieces of advice from watching him. For jewellery assembly I am a big fan of what Adam refers to as 'order of operations' which is working out the best and most efficient order of doing things to complete a task in the fastest and most logical way. If you want to learn more about this I highly recommend Adam's book 'Every Tool's A Hammer: Life Is What You Make It' which I reckon is a must for any maker.

For a shimmy bracelet I get all the components I need and set them out on my work surface.

First up, beads.

How to make a beaded chain charm bracelet

These are an assortment of simple lampwork spacers I made in four shades of pink.

Next, findings.

How to make a beaded chain charm bracelet

These are all antique copper-plated brass, except for the clasp which is lead-free pewter. I've gathered quite the collection of antique copper-plated findings and components over the years and now seems like a good time to use them because much like Lurpak butter, the price of sterling silver is getting ridiculous. Sure, brass costume jewellery may not weather as well as sterling silver wearables, but it still looks nice and enables me to charge lower prices. Besides, if Vivienne Westwood can sell brass jewellery (we bought Robyn a Vivienne Westwood bracelet for her 18th) then so can I.

My first job is making the bracelet base from a length of chain, some jump rings, a clasp and a bead dangle.

How to make a beaded chain charm bracelet

Next, I thread all of the beads on to headpins, topping each one with a copper round bead.

How to make a beaded chain charm bracelet

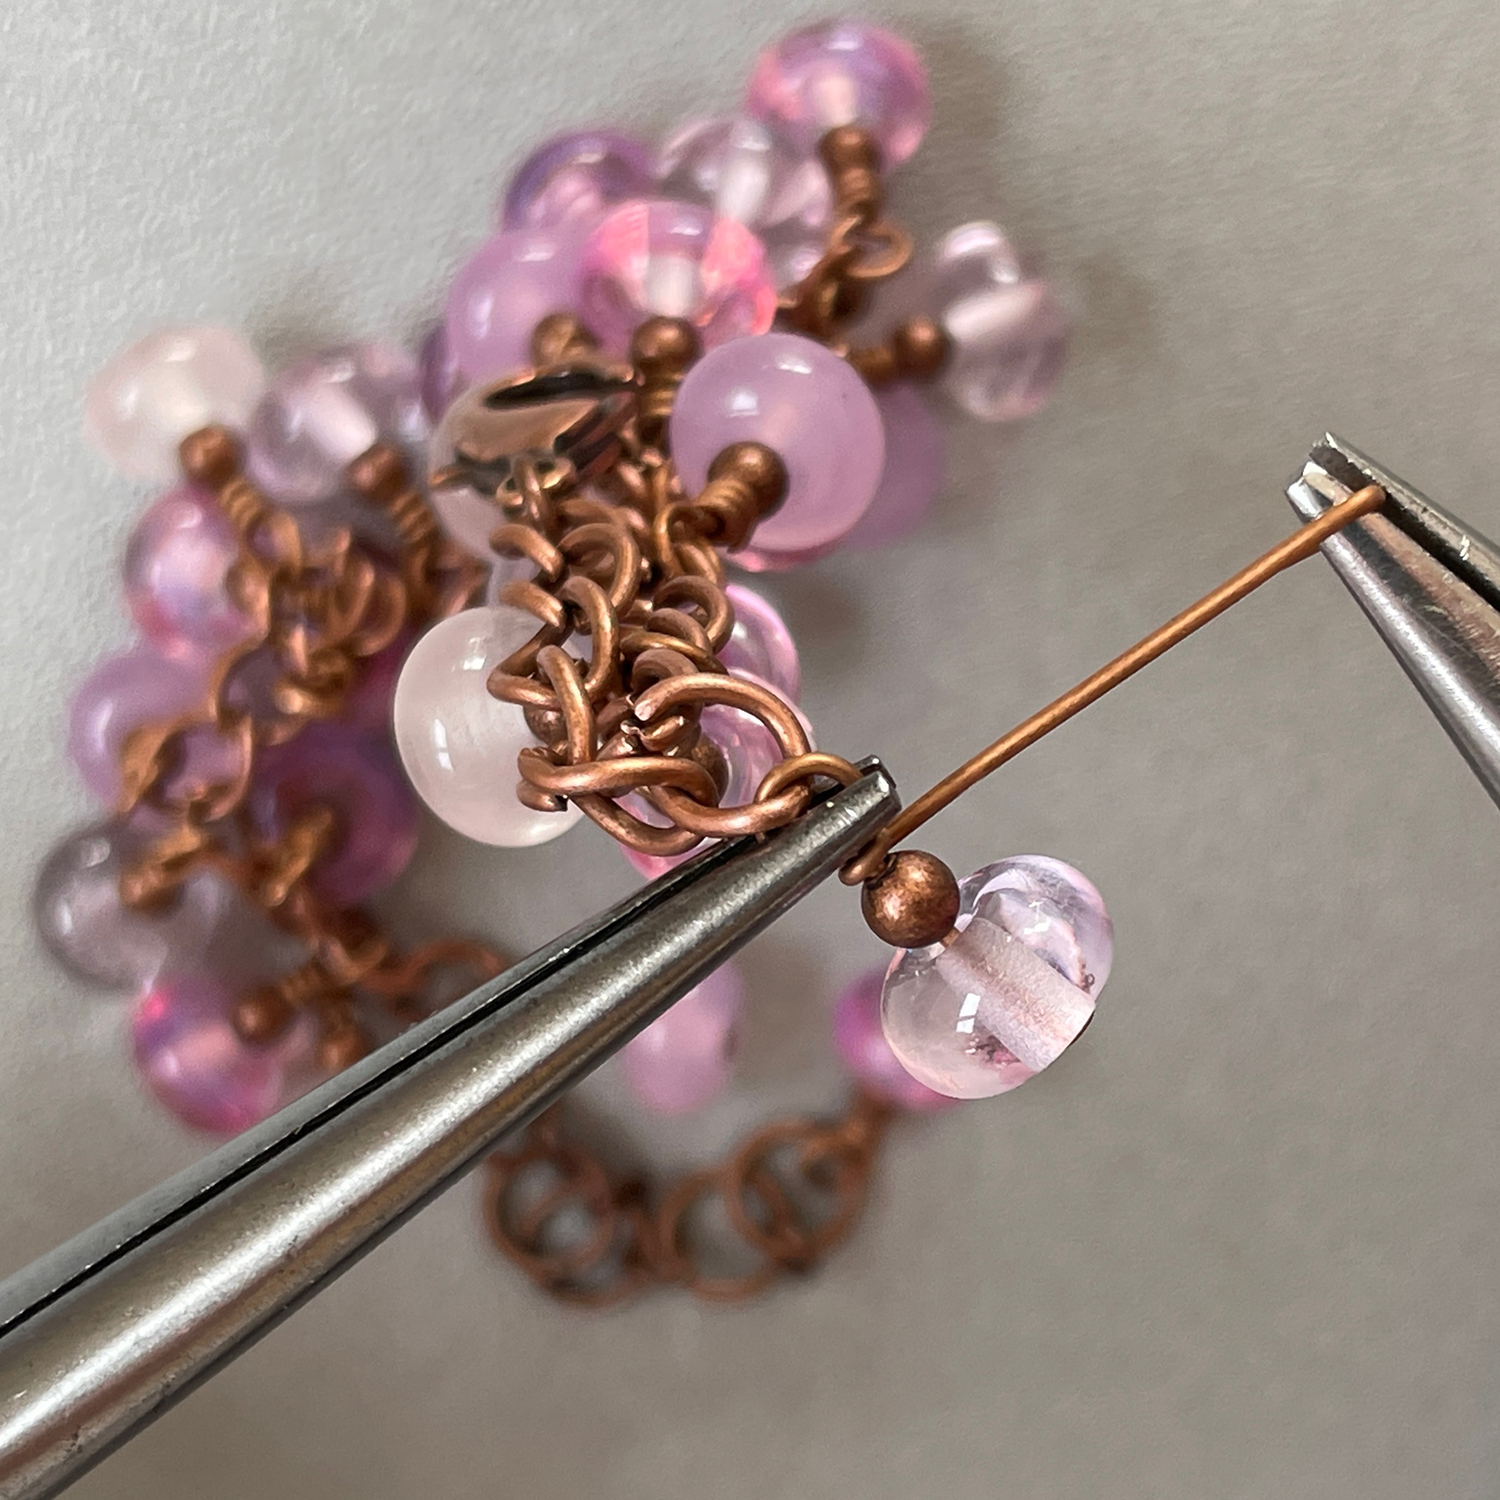
I then create the first bend of the wrapped loop.

How to make a beaded chain charm bracelet

I do this for all of the beads.

How to make a beaded chain charm bracelet

I then work through all the headpins again, this time making the loop.

How to make a beaded chain charm bracelet

By doing this one-task-at-a-time thing I'm not constantly threading beads, putting one pair of pliers down and picking another one up. The repetitive nature of each job also enables me to be consistent so that my bends, loops and the resulting wraps will all be even.

How to make a beaded chain charm bracelet

Next, I attach each headpin to the chain and wrap the loop. I trim off the excess wire and after all the beads are attached to the chain I work along the bracelet, tucking the wire ends in and straightening everything up.

How to make a beaded chain charm bracelet

I timed this whole bracelet assembly; from gathering all the parts to finishing the bracelet took me an hour and a quarter. Not bad going for all those wraps.

Handmade lampwork glass bead bracelet by Laura Sparling

I don't know if any of what I've shown and written here will be of use to you. If you're already a fellow order-of-operations devotee then I'm giving you a knowing nod. If you're not, give it a go. It's amazing how much time you can save by calculating the most efficient way of doing something in order to become a one person factory-style production line.

Handmade lampwork glass bead bracelet by Laura Sparling

If you like the look of this very pink 'Candyfloss' shimmy bracelet, it's in my shop.

I'm going to be doing a bead giveaway here on my blog in the very near future, so please do bookmark me or check back soon.

Friday, 1 April 2016

Beadswax

Beadswax - olive oil and beeswax polish for finishing etched lampwork glass beads

It's safe to say that I'm utterly in love with my tumbler and the beautiful satin finish that it puts on my beads. The thing that takes tumble-etched beads to the next level, though, is the final finishing 'beadswax' touch.

Lampwork glass tumble-etched beads with an oilve oil and beeswax finish

Etched beads are pretty as they are but a thin application of this olive oil and beeswax mixture gives them a subtle, soft sheen that makes them glow. I made this little jar of what I'm calling 'beadswax' using the directions I found on the Lavender Creek Glass blog. I melted five tablespoons of extra virgin olive oil with two tablespoons of beeswax pellets. I used BP grade beeswax pellets, meaning that they are certified as suitable for use on skin and in cosmetics. I poured the beadswax into a super-sweet little Kilner jar that I got from Lakeland.

Lampwork glass tumble-etched beads with an oilve oil and beeswax finish

To wax my beads (oooh, saucy) I scoop out a little bit of the beadswax, rub it between my fingers and then I give each bead a little massage. I then buff my beads (oooh again) with a cotton cloth. The beads are left with a beautiful sheen that just makes their satin finish sing. And don't be thinking that the beads are greasy or sticky because they're not at all. The beadswax will eventually wear off but will be replenished by the natural oils of hands and skin during handling, or when the beads are worn.

The beadswax doesn't just work for tumble-etched beads, which can seem a little 'dry' after the tumbling process - it's great for chemical-etched beads too.

Big thanks to Teresa at Lavender Creek Glass for sharing her bead polish recipe.

Friday, 18 March 2016

Tumble-etching lampwork beads

Tumble-etched lampwork glass beads by Laura Sparling

I've always used Dip-N-Etch etching fluid to etch my beads but recently it has become near-on impossible to get hold of here in the UK and getting it sent from abroad is mighty costly. I'm not totally sure why UK people have stopped selling Dip-N-Etch. Etching fluid contains some potent chemicals and potent chemicals are never a brilliant thing to be faffing around with. I've never had a problem or an accident using Dip-N-Etch in the dozen years I've been making beads, but a quick Google will deliver you many a forum thread about how evil it is, or might be. Royal Mail also recently tightened up their prohibited items list and they're very fussy about sending things like batteries and nail varnish so I'm guessing they wouldn't be too happy about carrying parcels which contain chemicals that can eat glass. I guess it's a mix of chemicals and postal rules that have resulted in Dip-N-Etch becoming as rare as fish tits in the UK.
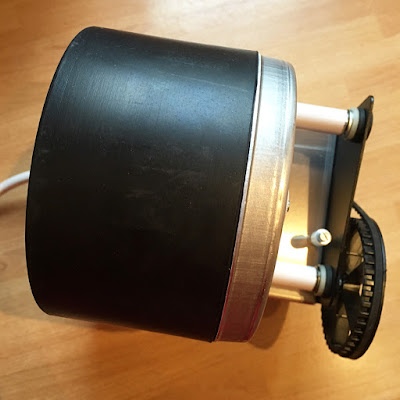
Electric tumbler for tumble-etching lampwork glass beads

So this is why I bought Boy George. He's my new tumbler. (Culture Club did a song called 'I'll Tumble 4 Ya', in case you're pondering my naming.) Tumblers are used in lapidary to polish stones and rocks and they're also used by jewellery makers to harden and polish metals. I'm using my tumbler to tumble-etch my beads. Etching is where you remove the shine of the glass to leave a matt, satin finish. Tumbling is a much safer, more eco-friendly way to etch beads than chemical etching. It's basically making sea glass. Pieces of sea glass start life as broken bottles and other glass items. The sea tosses and swishes the glass fragments against stones, rocks and sand, and after a while the shiny glass surface is worn down to a soft, velvety one.

To tumble-etch beads you need a tumbler. Mine is a very basic one from Electric Tumblers. I opted for their 'Home' tumbler motor base (£77.50) and a 510g rubber barrel (£29.95). You can get plastic barrels, which are cheaper than the rubber ones, but from what I can gather, they are prone to leaking and they also make a lot more noise.

Electric tumbler with rubber barrel for tumble-etching lampwork glass beads

You will also need some silicon carbide grit. I'm using 800 grade and I got a 500g container of it from eBay. This is a lot and it'll last me for yonks, so do be aware that you can buy smaller quantities if you'd prefer. Amanda at Mangobeads sells silicon carbide grit in small quantities. She's also written a fantastic article about silicon carbide and its uses in lampworking. I highly recommend having a read of it.

800 grade silicon carbide grit for tumble-etching lampwork glass beads

Silicon carbide grit ranges from coarse to very fine. The higher the grade number, the finer the grit. Coarse grit will give you a rougher finish on your beads so if you like to make beads that look like ancient relics, or if you like a lot of texture, opt for a coarser grade grit. For a really smooth, satin finish you will need a much finer grade - 800 or 1000 are super duper.

800 grade silicon carbide grit for etching lampwork glass beads in a tumbler

Then you'll need some kind of tumbling matter that will actually tumble about in the tumbler and rub the abrasive silicon carbide against your lampwork beads. I got a big bag of cheapo 6mm Czech glass beads from eBay.

6mm Czech glass beads to use for tumble-etching lampwork glass beads

I filled my rubber barrel just over halfway with the cheapo beads. (I'm not being rude by calling them 'cheapo beads'; I'm doing it to distinguish them from my lampwork beads. If I keep saying 'glass beads' I might confuse the situation.)

6mm Czech glass beads to use for tumble-etching lampwork glass beads

I then added one tablespoon of silicon carbide.

Czech glass beads and silicon carbide for tumble-etching lampwork glass beads

Next I added the lampwork beads for etching. I selected a few from my Lonelies jar and cleaned any bead release out of their holes. Notice how these are all round and smooth with no sculptural or raised bits? This is because the tumbling matter has a limited reach. Those cheapo glass beads aren't going to get into nooks and crannies and creases and dimples. Sure, you could use smaller cheapo beads but I think you'd have part-etching issues, which of course could be used to an advantage from a design point of view. It's all a matter of personal taste.
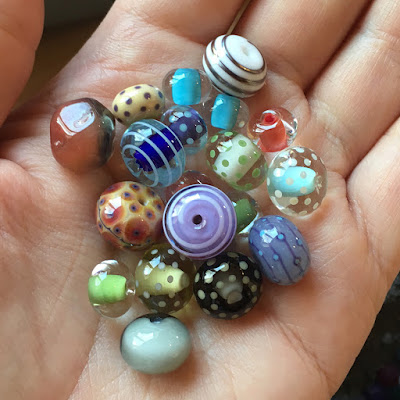
Lampwork glass beads before tumble-etching

Put your lampwork beads into the barrel and add enough water to just cover the contents. Add one drop - one single tiny drop - of washing-up liquid. I don't know why the washing-up liquid goes in. I expect there's a scientific reason. Maybe it's because jewellery makers who use stainless steel shot in their tumblers when tumbling metal use washing-up liquid, so we just think that we have to put washing-up liquid in all tumblers? I don't know. I can't think of a logical reason but hey, it can't hurt and it feels exciting and sciencey to add a single drop of the stuff to the mix, so go for it. (Just one drop, mind. Not a big squirt like you're doing the washing up after a Christmas dinner, or your tumbler barrel will end up foaming at the mouth.)

Lampwork glass beads with water and silicone carbide for tumble-etching

Put the lid on your barrel, do it up all nice and tight and set it on the tumbler. I left Boy George going for five hours.

When my beads had finished tumbling, I removed the barrel lid and scooped out the lampwork beads with an old spoon. No, I've not gone for an arty monochrome shot here. As I expected, the dye from the cheapo beads wore off during tumbling.

After tumble-etching

I fished my lampwork beads out with the spoon and put them into a plastic tray. My advice is to make a note on a post-it of how many lampwork beads you put into the tumbler, and stick the note nearby, so you'll know how many beads you're looking for.

Lampwork glass beads after tumble-etching

I then washed the lampwork beads in soapy water, rinsed them off and dried them. Ta-dah! Satin smooth, ever so touchable, very nice to feel, "Oh I say, peachy-soft bead, do you moisturise, darling?" tumble-etched beads.

Lampwork glass beads after tumble-etching

If you compare the before and after lampwork bead photos, you can see that the white bead with a metallic spiral has changed to a white bead with a not-metallic spiral, so bear that in mind if you're thinking about etching metallic glasses. Some beads look better un-etched but some lend themselves to it perfectly, like my 'Mango' Luminobeads.

Tumble-etched lampwork glass beads by Laura Sparling

Because the dye from the cheapo beads came off, I rinsed them, cleaned out the barrel and put them with new water and silicon carbide for the next tumbling, but you don't need to change the solution every time. Just keep the tumbling matter in the barrel and change it after a few tumble sessions.

Ready for the next tumbling

And that's how I tumble-etch my lampwork beads. As I've said, you can experiment with different grade silicon carbide grits, different types and sizes of tumbling matter, and the types and styles of lampwork beads you want to etch. There are several glasses that don't like chemical etching and they stay shiny or go patchy, so tumble-etching is a fab solution to that problem.

If you already have an electric tumbler that you use for jewellery making, make sure you use a totally different barrel for any tumble-etching.

I think that's about it. If you've got any questions, please leave them in the comments.

EDIT: If you've found this post useful or interesting, you might want to read my blog post about 'Beadswax' which is an oil and beeswax mixture that I use to finish my tumble-etched beads. It gives them a lovely soft glow.

Wednesday, 10 March 2010

Making Mandrels

Me making mandrelsIt got to the point this morning where I was down to about ten mandrels. After each bead-cleaning session I clean and dry the mandrels and throw away any bent ones and eventually they dwindle away and then it's time to make some more. MandrelsI haven't bought ready-made mandrels for at least four years. Instead I cut up stainless steel welding rods which saves so much money you wouldn't believe it. I have a five kilo tube of ESAB 1.6mm rods and one of 2.4mm rods. I mainly use the 1.6mm ones for my beadmaking. One tube of welding rods goes a long way. You can get four mandrels out of one rod. As I say, I've had these tubes of rods for over four years and I'm only two thirds of the way through the smaller ones.
You don't have to buy a five kilo tube - some places sell the rods by the kilo or less. It may be worth going into your local welding supplies place and asking them about buying some. You will save so much money in the long run. Here are the labels off my rod tubes - print the picture out and take it along with you :
ESAB stainless steel welding rodsPlease click here for a list of ESAB dealers and maybe you can find one near you.
I have a pair of cutters (the make is Facom) that cut the 1.6mm rods quite happily. They do cut the 2.4mm ones too but you need a bit more grunt - I use two hands. Or if I'm feeling particlualry feeble I get Dad to cut them for me!
Sandpaper and cuttersAfter I've cut up my welding rods into mandrel-sized lengths I sand the ends of them on some heavy-duty sandpaper to take off any sharp bits and then I'm left with a bunch of shiny new mandrels!

Tuesday, 9 February 2010

Mini Tutorial : Wiggledot Bead

This mini tutorial shows you how I make one of my Wiggledot beads. This is quite an easy bead to make but it does offer you a host of design possibilities because you can alter the dot placement, the number of dots, the colours and so on.

Step 1


Make a donut-shaped bead. Remember to start off quite a bit smaller than you want the finished bead to be as you'll be adding quite a lot of glass to your base bead.


Step 2


Apply a band of stringer around the middle of the bead. Different stringer sizes will produce different effects. Don't go too fine with the stringer though or you'll hardly see it.


Step 3

Melt the stringer band in so it is flush with the surface of the bead and then add four dots, evenly spaced, around the left hand side of the bead. These dots need to be quite large and most importantly they need to be the same colour as your base bead. Don't let the dots touch the stringer band.


Step 4

Add another four dots to the right hand side of the bead so that they're offset from the first four.


Step 5

Melt all of the dots in slowly and gradually so that they don't distort. Bring your bead out of the flame and let the glow subside from time to time if needs be.


Step 6

You should now have a plain bead with a pretty wiggly line around its centre. This was caused by the dots pushing the stringer out of shape as they melted into the surface.


Step 7

Using a different colour add another eight dots, just as you did in steps three and four. You might want to make them smaller than last time. Then melt them in slowly and gradually.


Step 8

Repeat step seven using a different colour. I'm using Efftere transparent dark teal.


Step 9

If you like you can add more dots on top of the last ones .....


Step 10

..... and even a few more if the mood takes you! Remember that the more dots you add the more your wiggly line will wiggle and the bigger your bead will be.


Step 11

The finished bead.


Hints & Tips

~ You can use either a transparent or opaque base for this style of bead.
~ Try using Goldstone (Aventurine) stringer for the wiggly line.
~ More than eight initial dots will create more of a wiggly line.
~ Plunge and case your dots for that groovy trapped bubble effect.
~ Leave some of your dots raised for texture.


If you make any Wiggledot beads with the aid of this tutorial please
email me some photos of them - I'd love to see!

Sunday, 1 November 2009

Tutorial : Basic Encased Bead

Encased Bead My last tutorial was about casing a bead with a thick, magnifying layer of transparent glass. This one shows you how I encase a donut-shaped bead with a thinner layer of glass. Again, these make wonderful base beads for stringerwork or for other surface decoration. Please click here to see a video of me demonstrating this technique.
I have a Carlisle Mini CC torch and for this tutorial I'm using CiM Glacier, Vetrofond clear and a 1/16 mandrel.

Step 1

Lampwork Encasing TutorialMake a small donut-shaped bead. I tend to aim for a base bead that's about 8-9mm in diameter. You should bear in mind that your encasing glass is going to dramatically affect the finished size of your bead so always start off small. Keep your base bead warm by wafting it through the top part of the flame while you heat a gather of clear glass ready for encasing. You need to heat a glob of clear that's approximately three times the size of your base bead.

Step 2

Lampwork Encasing TutorialAt this point your base bead should be warm but not glowing. Once your gather of casing glass is really molten you need to press it onto the bead, pushing the molten glass so that it spreads out to cover the width of the bead. Do not touch the mandrel with the casing glass.

Lampwork Encasing TutorialAs you press, turn the mandrel slowly away from you to gather the molten glass from the rod. This part is particularly tricky to describe in words so it may help if you take a look at the video (at about the 2:40 mark) to see exactly what I mean.

Step 3

Lampwork Encasing TutorialMelt your casing glass off. I usually do this on the left hand side of the bead. As you can see, I haven't gone too close to the bead hole with the casing glass.

Step 4

Lampwork Encasing TutorialNow you'll probably need to add some clear glass to the right hand side of the bead in order to even things up. Build your bead as evenly as you can and it'll save you time later on.

Step 5

Lampwork Encasing TutorialBring your bead out of the flame to cool it down and stabilise it a bit. Then reheat the left hand edge of the bead. You want to aim the flame at the encasing. Once the glass is glowing take a Corina Magic Wand (or similar metal tool) and gently nudge the clear glass toward the bead hole. Again, don't touch the mandrel with the glass. You're just helping the glass on its way using a gentle pushing, nudging action. Now bring the bead out of the flame and let the glow in it subside.

Step 6

Lampwork Encasing TutorialRepeat the glass nudging process on the right hand side of the bead and keeping the mandrel turning and horizontal take it out of the flame to cool it slightly.

Step 7

Lampwork Encasing TutorialOnce the glow has gone, put the bead back into the flame and heat it to an even glow and then round up your bead.

Step 8

Lampwork Encasing TutorialNow for a little moment of quality control. Bring the bead out of the flame and check it for any colour bleed. If you need to make the bead bigger you can add a little more casing glass then reheat and round up.

Step 9

Lampwork Encasing TutorialThe finished bead all ready to be decorated.

Hints & Tips

This technique is fabulous for playing with colour. Create new shades by layering coloured transparents over opaques. For example, try amber over red for a rich warm orange, cobalt over light sky blue for a gorgeous royal blue and of course, the classic Corina combo of amethyst over periwinkle for a delicious deep purple. Roll your base bead in frit before you encase for simple but very pretty beads. The casing adds a beautiful depth and sparkle. Try wrapping a stringer of silvered ivory or maybe some silver wire around the base bead. Again, simple but effective. Creation Is Messy (CiM) opaque glasses make excellent bases for encasing as they tend to be slightly stiffer. I personally love Glacier, Gelly's Sty and Dirty Martini. (And no, I'm not sponsored by CiM or anything - I just LOVE their glass!) 

  All images and text in this tutorial copyright © Laura Sparling 2009