Wednesday, 28 October 2009

Odd Job

My highly-organised glass rod stash
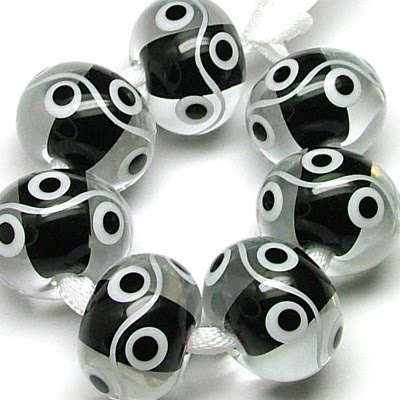
Sometimes I forget how totally bizarre my job must appear to other people. I started this lampworking malarkey five and a half years ago and back then I had no idea that you could have fun melting glass in the comfort of your own home. Or shed. Now it's my job and I'm so used to it I forget that other non-glassy people probably don't know what lampwork is, just like I once didn't.

When I meet new people and they ask me what I do, I tell them that I'm a beadmaker. They usually nod politely and tell me that their sister, neighbour or friend-of-a-friend makes jewellery too. Then I have to explain that no, I don't make jewellery - I actually make the individual glass beads. Then I normally do a whole What's-My-Line? type mime and a quick explanation to back it up. I've got quite good at it - I can describe my occupation in just one sentence now!

I mention this because today the double glazing people came to fit new windows and a new front door. I let them in, made them cups of tea and then I settled down to melt glass in the conservatory while they went about their windowy business. Every now and then I'd catch sight of one of the window men lurking in the lounge trying to figure out what the heck I was up to with a flame and some glass rods whilst wearing some attractive purple glasses. Eventually I beckoned them in and explained what I was doing and they were fascinated. I love how people react to seeing what I do - it's a kind of a cross between wonder, puzzlement and a so-that's-how-beads-are-made reaction. I guess it's pretty much the same reaction I had when I first read my Cindy Jenkins' 'Making Glass Beads' book all those years ago .....

Tuesday, 27 October 2009

CiM 'Mojito'

CiM 'Mojito' Glass RodsThe postman just delivered this.

A bundle of Creation Is Messy glass rods in 'Mojito'.

If it melts as good as it looks I shall be a happy happy beadmaker!

Monday, 26 October 2009

'Monochrome Simplicity'

Lampwork Glass BeadsI never tire of black, white and clear glass. This spotty set features a glossy black heart focal decorated with a raised white heart. Clean. Simple. Striking.

Tutorial : Basic Thick Encasing

Encased BeadsI get asked about this technique a lot. It's a very useful skill to learn and you'll find it will open up a whole new realm of potential bead designs for you. This particular type of encasing is a great way of getting a great depth to your beads. Any design applied to the surface really stands out and sometimes has that floaty kind of look to it. I've put together this ten step photo tutorial as I seem to be writing it out in words for people on a weekly basis! I hope fellow beadmakers find this helpful and even if you're not a glasshead maybe you'd like to see what goes into making an encased bead like one of those in the picture up there.
Just so you know, I have a Carlisle Mini CC torch with a torch-mounted marver and for this tutorial I'm using Efftetre black, Vetrofond clear and a 1/16 mandrel.

Step 1

Lampwork Encasing TutorialMake a tiny donut-shaped base bead. And I mean tiny. Imagine small and then make it smaller. This donut is about 5mm diameter. When you make the initial wrap touch the molten glass to the mandrel very lightly so you have a very narrow footprint.

Step 2

Lampwork Encasing TutorialRoll your tiny donut bead on a marver to create a neat cylinder. I roll mine out to about 5mm long. I say make it neat because the neater you build your bead, the less work you'll have to do in the rounding-up part of the process. And why a cylinder? Well, when you're learning to encase it's much easier to apply a casing layer to a flat surface as opposed to a round one.

Step 3

Lampwork Encasing TutorialNow melt a glob of molten clear glass (not shown as I was making this bead with one hand and taking the photos with the other) that is about three times the size of the base bead. All the while you must keep your cylinder warm by flashing it in and out of the flame. When your glob of clear glass is really molten press it onto the base cylinder and wrap it around the bead. I tend to wrap and melt the glass off on the left hand side of the bead so I end up with more clear on the left hand side of the bead than the right. Don't touch the mandrel with the glass - you just want to apply it to the base bead. If you touch the mandrel with the casing glass then the bead is doomed. Unless funky, patchy encasing was the look you were going for .....

Step 4

Lampwork Encasing TutorialNow add some more clear glass to even up the casing layer. As I said, I melt my clear off to the left so I always need to add more to the right. So judge it by eye and add more clear where the bead needs it. Remember - you're building the bead as evenly as you can at this point as it saves you time (and stress) later.

Step 5

Lampwork Encasing TutorialRight, now for the crucial bit. We have to melt the clear down so that we get nice neat edges to the bead without any of the base colour leaking up on to the surface. To do this, concentrate on one half of the bead at a time. Aim the flame where you want the glass to move to. Glass likes heat and it will follow it. So heat the left edge of the bead first (you could do the right side first but this is the way I do it) and you want to get the clear glass warm enough that it starts to move towards the mandrel, covering the base colour as it does so. Again, don't let the clear touch the mandrel. Stop heating just before you think you need to and then bring the bead out of the flame, keeping it turning and horizontal.

Step 6

Lampwork Encasing Tutorial
Now for the other side. Repeat the process described in step five, letting the clear glass move down towards the mandrel on the right hand side of the bead. Again, bring the bead out of the flame and let the glow come out of it.

Step 7

Lampwork Encasing TutorialAt this point you may want to add a little bit more clear glass in order to make the bead up to the desired size or it may well be just the size you wanted it to be. I guess it all depends on how pernickety you are about this kind of thing ..... ;o)

Step 8

Lampwork Encasing TutorialMelt the clear glass in and round up your bead. Remember to keep that mandrel horizontal.

Step 9

Lampwork Encasing TutorialThis is the quality control check bit. Bring the heat out of the bead and check the bead ends to make sure you've got no colour bleed.

Step 10

Lampwork Encasing TutorialThe finished bead. Now it's all ready to decorate!

Hints & Tips

When you're learning this technique it's a good idea to use a dark transparent for your base bead. This is because transparent glass doesn't bleed like opaques do and if there is any leaky colour you won't really see it.
Again, when you're practicing, my advice is to stay away from ivory as a base colour - it's tricky to case without bleeding happening.
If you're encasing black, your base bead needs to be warmer than usual (the glow must have literally just faded before you wrap it with the clear) or else it will cause scumming. Tiny little white bubbles are not all that attractive.
You don't have to stick to clear glass for the casing layer - try coloured transparents for different effects.
Etching this style of encased bead creates a gorgeous glowing effect. Take a look at my Luminobeads to see what I mean.
Try trapping some silver wire, silver foil or frit between the glass - the encasing will magnify whatever is underneath.
Don't let your bead get too hot and melty. Bring the glow out of it every now and again as this will help to stabilise it. If things get too molten it all gets out of control and starts to go wrong. Just take your time, relax and enjoy!

All images and text in this tutorial copyright © Laura Sparling 2009

Sunday, 25 October 2009

'Geology'

Lampwork Glass BeadsThese light brown and grey beads are decorated with bands of silvered ivory and tiny droplets of fine silver all encapsulated in a layer of clear glass. Subtle but pretty.

These will be for sale in the usual place at 8.30pm (UK time) tomorrow night.