Showing posts with label Cooking. Show all posts

Monday, 6 June 2016

Recipe: Lemon & Coconut Slice

Lemon and Coconut Slice

I had the loveliest cake in Starbucks the other week. It was a lemon and coconut slice; a thin pastry-ish biscuit base topped with lemon curd and a layer of coconutty ooh. As I sat there eating it I was trying to think if I'd ever had a lemon and coconut baked good before and I honestly could not recall one. Like some kind of cake addict I went in to Starbucks again this weekend, with the sole intention of grabbing a piece of the lemon and coconut slice, but they had none. It was 'limited edition' apparently. Whatever.

A quick Google told me that lemon and coconut slice seems to be an Australian thing. Well done, Australians - I salute your wondrous cake-making skills! A lot of the recipes I found were for no-bake slices made with condensed milk but none of them seemed to have the base bit. I eventually found a couple of baked ones and I kind of melded the recipes together. The measurements were all in cups so I've converted them to good old metric which should make life a bit easier. Well, it does for me. (Cup measurements annoy me, you see.) The resulting cake has a sightly different base to the Starbucks one but it doesn't matter because it's flipping delicious.

Before I list the ingredients and give you the recipe, yes I'm aware this contains a fair amount of sugar. I know that sugar is considered heinous and toxic these days but nobody is suggesting that you make cakes every single day and eat them for breakfast, lunch and dinner. Michaela Strachan would not be happy with this recipe (she had a benny about The Great British Bake Off last week) but that's fine because I'm not inviting Michaela Strachan round for tea and cake any time soon. Or ever, actually.

If you're feeling fancy you could make your own lemon curd for this recipe but I just used the stuff in a jar from the shop.

Lemon & Coconut Slice

Ingredients


For the base

125g unsalted butter
160g caster sugar
220g self raising flour
1 large free range egg, beaten
Lemon curd

For the coconut topping

125g dessicated coconut
160g caster sugar
1 large free range egg white

Method

Preheat your oven to 180°C (160°C for fan assisted ovens) or gas mark 4. Line a 20cm x 20cm tin with baking paper.

Base: Melt the butter in a saucepan. In a bowl, combine the sifted flour and the caster sugar. Add the melted butter and mix. Add the beaten egg and mix again. You'll end up with a fudge-like loose dough. Tip it into the lined tin and press down and level. You can use the back of a spoon or a spatula but I found it easier to use my (clean) hands. Bake the base in the oven for 15 to 20 minutes or until it is a light golden brown.

Topping: In a clean bowl, lightly beat the egg white with a whisk until it is thick and foamy. You're not making a meringue here so you're not looking for glossy stiff peaks of egg white; just whisk it until it is like dense, lathery soap. Add the dessicated coconut and caster sugar and stir it all together with a metal spoon. You should end up with a kind of crumbly mixture.

Spread the cake base with lemon curd. Two or three tablespoons of lemon curd should do the job but use as much as you fancy. Sprinkle the coconut mixture over the top. Again, I used my hands and kind of crumbled it on all over. You don't need to press it down; just make sure there's a nice even covering.

Return the tin to the oven and bake for a further 10 to 15 minutes or until the coconut topping is golden brown. Leave to cool in the tin (are there three more annoying words in baking than "leave to cool"?) and then remove the slice from the tin and cut it into as many squares or bars as you like.

I guess you could use whatever flavour jam or curd you fancy. I think raspberry or cherry would be very lovely but there's something ever so summery about the lemon and coconut combination.

Happy baking!

Friday, 25 March 2016

Randy doves, pink glitter, pasta and beads

Water droplet on a collared dove feather

I've had one of those weeks that never really gets going. Do you know what I mean? You start off on a Monday feeling ready to take on the world but all of a sudden it's Friday and you've not got much to show for it.

So what did I do with my week?

Well, amongst the whole not-feeling-very-beadish, I took a couple of photos. The one at the top of this post is a water droplet on a collared dove feather. We get so many collared doves in the garden and right now they are at peak randy. The man doves spend a large amount of their day doing that groovy, bob-up-and-down "Hello, lady dove, fancy a snog?" dance that they do. The lady doves never seem particularly interested, though, and when they do eventually go "Oh, alright Steve, just get on with it" there is much flappy wing flapping. This feather was left behind on the grass after said sexytime flappery.

Whilst I was grovelling about the place picking up feathers, I also took this photo of a daisy. Daisies are such simple flowers but they're just so lovely.

Daisy

I'm into painting my nails at the moment. I go through phases of this. I cannot bear it when it gets chipped so I change it up quite often. At the weekend I got this bottle of Barry M glitter polish. I'm not usually a bright pink and glittery kind of person but something about this nail varnish made me go "Ooooh!" so I had to have it.

Glitter nail polish (Barry M 'Socialite', if you're interested)

I think that's the thing I like about nail varnish. I don't wear very bright colours clothes-wise because I have zero fashion sense and I'm always worried I'll end up going full Timmy Mallett, but nails are a way to go a little bit colour crazy on a very small scale.

All three of those photos were taken with my iPhone and OlloClip. You can see more of my photos over on my iPhoneography Tumblr.

I did make beads this week, just not very many. I did a set of Luminobeads called 'Green Smoke' and these have been tumble-etched.

Tumble-etched lampwork glass beads by Laura Sparling

I finished them off with a light application of an olive oil and beeswax mixture to really bring out their soft 'glow'. This will eventually wear off but will be replenished by the natural oils of hands and skin during handling, or when the beads are worn.

As I type, 'Green Smoke' are still available to buy. There are also some bargains to be had in my SALE section.

I taught someone how to make beads this week. Kelly was a total beginner and she did so well. Just look at her beads.

Kelly's first ever lampwork beads

I always say to beginner beadmakers that if they leave my shed having made a reasonably round bead with ends that won't injure anyone, then they'll have done really well. Kelly went beyond that and made some really lovely round frit beads and she even did some plunged bubble-dots. Top stuff!

If you'd like to come and learn how to make beads with me, I'm still taking bookings for one-to-one tuition in my shed here in Cambridge. There are only four places left on my two day course at MangoBeads in Devon in July so if you fancy that one, you'd best book a place; you can secure one with a £50.00 deposit.

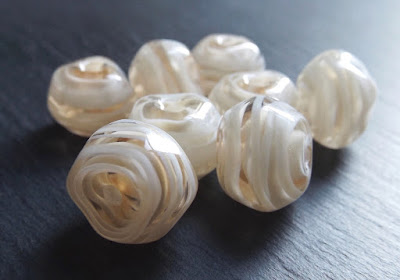
I finished off the week with some nugget beads. These were made with a Vetrofond odd lot called 'Smoke Rings'. It's a filigrano - very pale amber-brown with an ivory core. I only had one rod of this now very rare glass, so this eight bead set is a one-off. These 'Wisp' Nuggets will be in my shop tonight.

Lampwork glass nugget beads made with Vetrofond 'Smoke Rings'

Boy George is currently tumbling some more beads so I'll pop back and post a photo of the results later today.

Oh, I know - food highlight of the week - Chris and I cooked Antonio Carluccio's Penne Giardiniera, and my goodness it was so nice. We always have the Penne Giardiniera whenever we go to Carluccio's so being able to recreate it at home is a bonus. It was very quick to cook but seemed to use every cooking utensil, pot and pan we own, so washing up wasn't exactly fun-time central, but hey, it was worth it.

I think that's it. Not an awfully productive week beadwise, but sometimes my bead batteries go flat. I think they're recharging, though.

I was going to work today but it's a Bank Holiday and the sun is shining and the garden is a mess so I'm going to tidy it up. I've got some seeds to plant and some weeds to un-plant, so I reckon that's what I'll do with my day.

Have a Good Friday! (See what I did there?)

Sunday, 3 November 2013

Recipe: Chrimblecake

Christmas cake

I've just fed my Christmas cake a little snifter of brandy. Every time I feed it, it takes all my willpower to not feed myself. With cake. It smells so good!

We used to visit my family in Oxford each year and my grandmother always made a big, wonderful Christmas cake. She always used to say the cake was a bit dry/too moist/not boozy enough/too boozy/had too much icing/didn't have enough icing but it always tasted fab to us. As family numbers have dwindled and we've become more scattered as a family over the past decade, those Christmas get-togethers no longer occur and as such, there is no Nannie's Christmas cake.

So I've made my own Christmas cake for the past six years. I always focus on the cake itself. Although I have a very sweet tooth that even Willy Wonka would cringe at, I'm not a huge fan of icing, especially on Christmas cake. I normally opt for homemade marzipan and a very thin layer of fondant icing over the top of that.

Over the years I've tweaked and combined various recipes and when I baked this year's cake a couple of weeks back, I made a smaller version with the leftover mix and CAKE-BINGO! this is the one. This is my Christmas cake now. I wrote down the recipe and I'm writing it down here too in case you'd like to try it. Yes, there are a lot of ingredients and yes, it is time consuming and a bit of a faff but I really enjoy what has now become my own little Christmas tradition.


Notes

  • I always make my Christmas cake in mid-October but you'd be okay to make it at the end of November and it would still have time to mature.
  • You will need an eight inch (20cm) round, deep cake tin, some brown kraft paper, some string and some greaseproof paper. I use a heavy, loose bottomed tin and I wrap the outside of it in four layers of brown paper, tied with string to secure it. I make sure the paper is taller than the sides of the tin. I then line the base and insides of the tin with greaseproof paper. The cake will be in the oven for quite some time and the brown paper helps to prevent any burning. I also make a little silver foil 'lid' which perches atop the extended brown paper sides. Trust me, all the papercraft faffery is worth the effort. Also, it makes you feel like you're carrying out an ancient cookery tradition which is always fun. (Well, I think it is anyway.)
  • Have plenty of greaseproof paper, tin foil and an airtight tin ready for packing your cake in after it is baked.
  • You will need to prepare the fruit for the cake the night before the day you intend to bake it.
  • Feel free to use whatever dried fruits and/or nuts you fancy. You could add dates or dried apricots if you're not a fan of cherries or cranberries or walnuts if you don't like almonds.
  • This recipe is for the cake itself. I'm not covering icing here but you would need about 675g each of marzipan and fondant icing to cover this cake.


Chrimblecake

Ingredients

175g raisins
175g sultanas
275g currants
100g dried cranberries
100g halved glacé cherries
50g mixed candied peel
50ml brandy
150ml black tea (I use 2 teabags and steep for 3 minutes in boiling water)
225g plain flour
225g dark brown muscovado sugar
250g unsalted butter (at room temperature)
4 large eggs (at room temperature)
50g whole blanched almonds, chopped
1 tablespoon of black treacle
1/4 teaspoon of ground nutmeg
1/4 teaspoon of cinnamon
1/2 teaspoon of mixed spice
1/4 teaspoon of vanilla extract
Grated rind of one orange
Grated rind of one lemon
Dash of milk


Method

Put the raisins, sultanas, currants, cranberries, cherries and candied peel into a bowl, pour over the brandy and tea and stir. Cover the bowl and leave overnight so the the fruit soaks up the liquid. You might want to give the fruity booze mix a stir every now and then.

The fruits soaking in their lovely brandy and tea bath

On baking day, prepare your cake tin as described in the aforementioned notes and preheat your oven to 150°C (fan oven 140°C).

Put the flour, sugar, butter, eggs, treacle, spices, vanilla, orange and lemon rinds and the dash of milk into a large bowl and mix well. I use an electric hand mixer. When that's all thoroughly combined, add the boozy fruits and any leftover liquid from their bowl. Tip in the almonds and with a spoon fold everything together. This would be a good point to get any young humans you may have about the place to come and have a stir and make a Christmas wish.

When everything is stirred and all wishes have been made, spoon the cake mix into the prepared tin and and smooth out the top. I find using a fork for this part is more effective than the back of a spoon.

Rest the silver foil lid loosely over the top of the tin and put the cake in the oven. Yes, the temperature is low and yes, it's going to be baking for a while. You can't rush these things. 

Baking can take between two-and-a-half and four-and-a-half hours. Mine took about three hours. Leave the cake totally alone for the first two hours of baking. Don't open the door in that time. After two hours you might like to turn the cake around and have a quick peek to see that it's coming along. Everyone's oven is different and you know where its hot spots and not-so-hot spots are.

Obviously oven temperatures and cooking times will vary. Your cake will be done when you insert a cocktail stick or skewer into it and it comes out clean, without any raw cake mix on it.

When the cake is baked, don't fret at the colour of it. It will look paler than Christmas cakes you buy. This is because it will get darker as it matures. I brush the top of the cake with a little brandy whilst it's still hot. I then cover the top with foil and allow it to cool in its tin, on a cooling rack.

When the cake is totally cold, take it out of its tin and wrap it in greaseproof paper and at least two layers of foil. Put it in its airtight tin and leave it.

The following week, unwrap the cake and poke several holes all over it (don't go too mad) with a cocktail stick or wooden skewer and then brush the cake all over with brandy. I guess I use about a teaspoon or so at each feeding. Depends how boozy you like your cake.

I feed my cake by brushing it with brandy about every ten days. You don't need to do the pokey hole thing each time. Just make sure you wrap it up nice and tight. 

Come Christmas you should have a lovely, moist, fragrant Christmas cake that will taste so much nicer than a shop-bought one.

Google about for Christmas cake decorating ideas. There are so many ways to pretty it up. I normally opt for some icing holly leaves on top and a red satin ribbon tied around the cake.

If you do make a Christmas cake with this recipe, I'd love to hear how you get on. Send me some photographs if you like!

Have fun!

Saturday, 1 December 2012

Recipe: Vanilla Chai Biscuits

Vanilla Chai Biscuits

I got my bake on today and I decided that I wanted to capture the spicy flavours of vanilla chai tea in a buttery, crumbly biscuit. I'm really pleased with the results and I thought I'd share my recipe with you in case you fancy trying them too.


Vanilla Chai Biscuits
Makes 30

Ingredients

225g unsalted butter (room temperature)
110g caster sugar
275g plain flour
1 vanilla pod
1 ½ teaspoons vanilla extract
1 ½ teaspoons ground cinnamon
1 teaspoon ground ginger
1 teaspoon ground cardamom
¼ teaspoon ground cloves


Method

Preheat the oven to 170°C (150°C if using a fan oven) or gas mark 3.

Cream the butter until smooth. Add the sugar and beat until light and fluffy.

Sift in the flour and the spices. Split open the vanilla pod and scrape out the seeds and add these to the mix too, along with the vanilla extract.

Mix well.

Roll tablespoons of the mixture into balls (about the size of a walnut) and place on a baking tray lined with baking paper. Make sure you leave room for the biscuits to spread as they cook. Using a fork, slightly flatten the balls of dough.

Bake in batches for 15 to 18 minutes. Oven times will vary so make sure you check them. You want them to be golden at the edges. 

Remove the biscuits from the oven and leave to stand for a couple of minutes before transferring to a wire rack to cool.


Notes

You can buy ground cardamom but I only had cardamom pods in stock so I removed the seeds from their green casing and ground them with a pestle and mortar.

I use the tablespoon from my measuring spoon set to ensure consistent biscuit size.

Twinings Vanilla Chai Tea

The inspiration for these biscuits was Twinings Vanilla Chai tea. It comes in a beautiful Christmassy caddy and it tastes divine. The mix of festive spices with the creamy vanilla is just utter yum. (And no, I'm not being sponsored by them to say this; it is just a very lovely beverage.)

Happy baking!
Wednesday, 28 December 2011

Recipe: Cranberry & Orange Cookies

Cranberry and Orange cookies

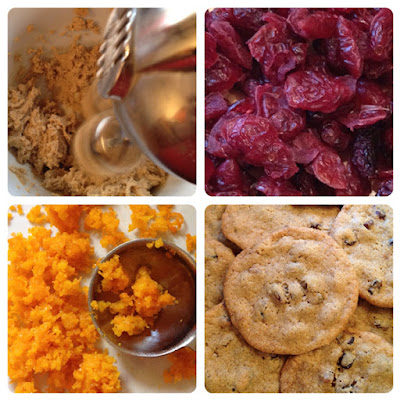
I had an orange and some dried cranberries left over from Christmas cookery stuff and I wanted to turn them into some biscuits but I couldn't find a cranberry and orange biscuit recipe that I liked so I got my Joliver on and I made up my own.  I'm really pleased with how they've turned out so I made a note of my recipe and I thought I'd share it with you lot too.


Cranberry & Orange Cookies
Makes about 16-20

Ingredients

110g softened unsalted butter
100g caster sugar (I used golden caster sugar)
50g soft dark brown sugar
150g plain flour
1/2 beaten large free range egg
100g dried cranberries
Zest and juice of one orange
1/4 teaspoon vanilla extract
1/4 teaspoon bicarbonate of soda
1/4 teaspoon salt

Method

In a large bowl mix the softened butter and sugars with an electric whisk until creamy and fluffy.  Add the egg and vanilla extract and mix in.

Add one teaspoon of grated orange zest and two tablespoons of the orange juice and mix again.

Stir in the flour, bicarbonate of soda and salt.  The mixture will be quite thick so you might need to switch from the electric whisk to a wooden spoon at this point.

Add the cranberries and make sure they're mixed in really well and are evenly distributed.

Roll heaped teaspoons of the cookie mix into balls and place onto a baking paper-lined baking tray.  I put about six biscuits on one tray.  You need to space them well as they do spread.

Bake in the oven at 180°C (160°C for fan ovens) for about twelve to fifteen minutes until the edges are golden. Remove cookies from the oven and allow to cool for five minutes before transferring them to a wire cooling rack.

The cookies will crisp up as they cool but they should have a nice soft, chewy centre.

Merry baking!

Thursday, 24 February 2011

Apple & Cinnamon Flapjacks

Homemade apple and cinnamon flapjacks
This week my Graze box contained some gorgeous apple and cinnamon flapjacks.  In fact, they were so gorgeous that I felt compelled to tweet about them :


They really were absolutely lush so I decided that I'd have a go at making my own.  I just adapted a normal flapjack recipe and I thought I'd post it here in case you fancied trying them too.  They're nice and crumbly and not too sweet and in the words of Tesco they're 'Perfect With A Cuppa'.(Have you noticed that they print that on almost every product in their bakery section?)


Apple & Cinnamon Flapjacks (AKA Stablefordjacks)

Ingredients

250g Porridge oats
125g Unsalted butter
75g Demerara sugar
3 Tablespoons golden syrup
1-2 Teaspoons ground cinnamon (I used two because I love cinnamon)
2 Dessert apples

Method

Preheat your oven to 180°C (160°C for fan ovens) and line a shallow tin (about 20cm x 20cm) with baking paper.

Gently heat the butter, sugar and syrup in a saucepan until the butter is melted and all the sugar has dissolved. 

Add the oats and cinnamon and stir in.

Peel and grate the apples and stir them in too.

Put the mixture into the lined tin, spread it out and press flat with the back of a spoon.

Bake in the oven for about 30-40 minutes until they're a light golden brown.

Remove from the oven and leave in the tin to cool for about twenty minutes.  Lift out of the tin and cut into bars or squares.

Enjoy!

Monday, 31 January 2011

Mum, Mick & Marguerite

Up until about five years ago I was absolutely awful at cooking.  I'm not saying I'm rivalling Nigella or anyone now but I tell you, pre-2006 I was a right cookery dunce.

Even school Home Economics lessons were bad.  I really wanted to be good at cooking but no matter what I did it always seemed to go wrong.  I remember the day I came home with a sausagemeat plait that I'd made in Miss Worth's lesson.  Mum had cleared away all family dinner cooking plans because that Tuesday night I - yes I, thirteen year old I - was feeding the family.  Mum was going to provide some mashed potato and vegetables but the undisputed star of the meal was going to be my majestic sausagemeat plait.

At three o'clock that afternoon I left my Geography lesson (what a waste of a subject that was on me - I have trouble pinpointing Cambridge on the weather map) and headed over to Block 5 to collect my culinary masterpiece.  I walked into the classroom which was filled with the aroma of baked pastry and warm sausage (bottle that, Gucci - there's a scent!) and found my sausagemeat plait sitting on a cooling rack with my name label next to it.  Dang, it looked good!  I was so proud.  I carefully lifted it into my red Family Circle biscuit tin and set off on my journey home. 

I kept the tin level all the way home.  I didn't even stop at Moore's newsagents for my daily packet of Space Raiders because I had an important cargo that needed to be shown to my Mum.  As I approached the house Mum opened the door for me and I carried my tin through to the kitchen.  I had such a grin on my face as I removed the lid for the big reveal ..... and then that grin quickly fell off my face as I looked inside the tin.  My lovely sausagemeat plait seemed to have shape shifted during the walk home.  Instead of gazing upon the delicious crisp, golden, carefully-braided loveliness that I'd lifted into the tin less than an hour before, I was looking (in horror) at a pale and oily plap of stuff that seemed to be sweating grease.  Think Mick Hucknall in pastry-and-meat form.  My sausagemeat plait had collapsed into a right old sorry heap. 

Mum got the fish slice and lifted the item out of the tin and onto a rack.  She dabbed at it with some kitchen roll in an attempt to remove some of the drippy fat and then she gently patted it back into some kind of shape.  I was thoroughly crestfallen (that's the first time I've ever used that word) and very disappointed.  The 'plait' sat on the cooling rack until about a quarter to six when Mum transferred it to a baking tray and put it in the oven to warm through.  On the worktop, underneath the empty cooling rack, sat a puddle of grease.  I have NO idea why my handiwork was so oily.  Maybe it was the sausagemeat or perhaps I got the recipe measurements wrong?  I don't know.

At six o'clock we sat down to dinner and Mum dished up slices of my plait onto plates.  Bless her, I knew she was trying not to laugh but I could tell that she desperately wanted to.  Her and Dad ate the sausagemeat plait (it's a joke to call it that) and Dad honestly seemed to enjoy it.  Sally wouldn't eat hers and I also refused to eat mine.  Thank goodness for Mum's mash and vegetables or we'd have been hungry.

So yeah, me, Home Economics and cooking in general just didn't go together.  I would help Mum in the kitchen, just as I always had - mixing cake mixture, making jam tarts, Angel Delight and Rice Krispie cakes, cutting out pastry leaves for pies and, of course, licking cake spoons and bowls - but whenever I tried anything more complex than that I would just fail miserably.

My Mum was an amazing cook.  Her cakes were sublime and she made the most wondrous apple pie.  Her roast dinners were superb and her bread pudding was legendary.  Mum would read cookery books like novels - she had a cupboard chock-full of recipe books of every age, type and description.  She absolutely loved the things.

My Mum died in 2006.  She had a heart attack on Mothering Sunday.  

I know.  

I was just starting to get into cooking.  It was back when Ready Steady Cook was good and Jamie Oliver was King Of The TV Chefs (he still is in my mind) and I was inspired by it all.  I'd planned to cook Mum a Mother's Day lunch.  We were going to have chicken chasseur followed by homemade pavlova.  Mum didn't feel right on Sunday morning and I joked that she was just trying to get out of eating my cooking!  I helped her upstairs so she could have a rest and I went back downstairs and set about cleaning beads and getting the raspberries out of the freezer to defrost ready for the pavolva.

Then all of a sudden, within the space of about forty five minutes, our lives changed forever.

We never did have that lunch.  I can remember tipping the chicken and raspberries into the bin the next day. 

One of the first things I said after Mum died (to a lovely paramedic who was wonderful and who made me a very sugary cup of tea) was 'I'm never going to eat one of my Mum's roast dinners again.'  A very odd thing to think of at such a time but it kind of tells you what an ace cook she was.

On the Monday I vowed that I was going to learn to cook like Mum.  I had to because we'd all become so used to her delicious meals and puddings that there was just no going back.  I went through Mum's recipe book cupboard and I fished out the book that I knew was her ultimate cookery Bible - Marguerite Patten's Every Day Cook Book.  That very book is sat next to me right now. 

Marguerite Patten's 'Every Day Cook Book'

Marguerite Patten's 'Every Day Cook Book'
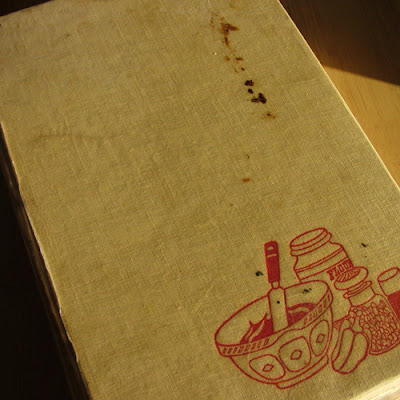
Mum's 1970 copy of Margeurite Patten's 'Every Day Cook Book'

It's the 1970 edition and is in a bit of a tatty state.  It has lost its dust jacket and some of its pages are loose.  The index is torn and in need of mending and the book feels floury (yes, actual flour - some probably about forty years old) and it has food splats all over it.  The front cover seems to have had a fight with some chocolate cake mixture and page 144 - the chicken and bacon pie page - has actual bits of pie stuck to it.  But despite its condition I love this book.  It was Mum's go-to recipe book and having read it and used it umpteen times myself I can see why she loved it so much.  I refer to this book at least once a week.  It contains everything you need to know about cooking.  

It also contains some amazing retro photographs of retro food.  I just love how there's so much orange (the colour, not the fruit) and brown - you just don't get food photographs like these now!

Images from Marguerite Patten's 'Every Day Cook Book'

But retro pictures aside, this book is amazing and  Marguerite Patten is amazing.  She has taught me how to cook and, more importantly, she has taught me how to cook like my Mum used to.  That chicken and bacon pie tastes exactly as it did when Mum made it.  Making the cakes, scones and flapjacks from the book reminds me of Mum because they taste just like hers did.  Isn't it marvellous how one bite of cake can bring back so many happy memories?

Obviously Mum isn't here to see how far I've come with my cooking.  She's not here to watch me in the kitchen using her recipe books, scales, mixing bowls and pastry cutters and she's not here to taste my cooked goods.  But when I'm in the kitchen twiddling about with cakes and pastry I feel closer to Mum.  I might have been a rubbish cook when I was younger but I've really improved and I'm learning all the time.  I can still hear Mum's voice and her words of cookery wisdom - "Roll it like that", "Cut it like this" and "Don't stir it - fold it in gently" - like some kind of Obi-Wan Kenobi in my mind.

Yes, cooking definitely makes me feel closer to Mum and that's a brilliant thing but I'll tell you what, there is NO way on Earth I am attempting another sausagemeat plait ever again!

Friday, 10 September 2010

Fresh Bread

Fresh Homemade Bread
I took a day off from beadmaking and this morning I did a spot breadmaking instead.  I've been meaning to do so ever since I watched the bread episode of The Great British Bake Off a couple of weeks ago.

It's just a plain white loaf and the recipe I used was fantastic!  It was a BBC Good Food one and can be found here.  It's definitely the best loaf of bread I've ever baked and we'll be having it (well, what's left of it) with soup for dinner tonight.

After reading all of the helpful comments on the recipe page I put in slightly less salt than recommended and I also used 150ml of boiling water mixed with 150ml of fridge-cold milk.  That made a nice tepid liquid for the yeast.  I also reduced the oven temperature and increased the cooking time.  The loaf is soft, fluffy and has a nice crisp crust.  Delicious!

I can't speak highly enough of the bread recipe - it'll definitely be my go-to one from now on.

Thursday, 8 April 2010

Em's 21st Birthday

Em with her birthday cakeToday Dad and I travelled down to Bournemouth to see Emily, my littlest sister, for her twenty-first birthday. I cannot believe she's twenty one. That makes me feel quite old! That's Em up there with her birthday cake that I made for her.

Mmmmm. Chocolate cake!I was chuffed with the cake. It turned out really well and it's SO chocolatey! The recipe is a Nigella one from her book Feast. The recipe can be found by clicking here.

We had a nice day - the weather was beautiful. We had lunch at a great restaurant called WestBeach and we sat and ate outside on the deck that overlooks the seafront. So nice! I had some of the best fish and chips I've ever had.

I've had a busy couple of weeks, hence the lack of beads and blogging but I have a free weekend coming up and I'll be melting some glass. Stay tuned for new beads .....

Monday, 4 May 2009

Yesterday's Pudding

Homemade Key Lime PieKey Lime Pie. It's not a full-on-traditional Floridian Key Lime Pie but it is dang tasty!

I used this recipe for it. After grating eight limes and then juicing them all my hands smelt pretty citrusy. I then went back to finishing off my green socks and I kept looking at the yarn and thinking 'I can smell lime!' which I could, of course. I think if my green socks had a smell they would indeed be lime. And now I sound like a complete nutter so I think I'll leave it there and go and clean some beads .....

Saturday, 28 February 2009

Actual Edible Cupcakes

Homemade Lemon CupcakesSally and the kids are visiting today so I was up and about early this morning baking these cupcakes to have after lunch. The cakes are vanilla with just a touch of lemon zest and they're filled with zingy lemon curd. I've topped them with delicious lemon cream cheese frosting and decorated them with little lemon jelly slices. Citrustastic!

Saturday, 7 February 2009

Oven Gloveliness

Oven GlovesI found these delectable oven gloves in a shop in Abingdon today and at the bargain price of £2.99 I just had to have them. I shall use them when I'm baking actual proper edible cakes as opposed to glass ones.

Saturday, 17 January 2009

Oat Biscuits

Homemade Oat BiscuitsThis is my three hundredth post. Yes, I've published three whole hundred posts full of beads and waffle. Yay me! I'm celebrating with a cup of tea and one (or two) of these homemade oat biscuits. They're like flapjacks in crunchy cookie form. Yum!

Here's the recipe for them (as requested by Sue) :

Oat Biscuits
Makes approximately 24

Ingredients
150g (6oz) Porridge Oats
150g (6oz) Self Raising Flour
150g (6oz) Caster Sugar
150g (6oz) Butter
2 Tablespoons Golden Syrup
2 Tablespoons Milk

Method
1. Heat butter, syrup and milk in a saucepan until butter is melted.
2. Pour into a bowl containing the oats, flour and sugar and mix together.
3. Roll heaped-teaspoon-sized amounts of the mixture into balls and place on a baking tray lined with baking paper. Space them well as the mixture will double in size.
4. Bake in batches at 180°C (160°C for fan ovens) for about 10-12 minutes or until golden brown.
5. Leave biscuits on baking tray for five minutes before transferring to a cooling rack.

Sunday, 7 December 2008

Mince Pies

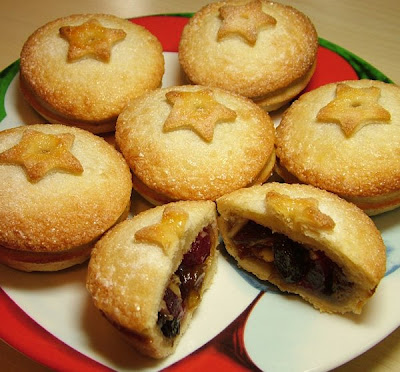
Homemade Mince PiesI spent this morning making beads and this afternoon baking mince pies. These are homemade all-butter shortcrust pastry filled with mincemeat, almonds, cherries and a slosh of Jack Daniel's for added Christmassy naughtiness!

Thursday, 4 September 2008

Cupcakes

CupcakesIt's my niece Robyn's fourth birthday today so I've made these cute cupcakes to take with me when I go and see her this afternoon. Vanilla cakes topped with pink buttercream decorated with sugar flowers and a dusting of spangly edible glitter. Yum!

Friday, 22 August 2008

'Psychedelic Peacock'

Psychedelic Peacock Lampwork BeadsThese have to be some of my favourite beads to date. The gorgeous green and pinky purple just seem to sing. They look so good together. Super duper! That's nice! (Excuse me - I watched Anchorman today.)

Big Hole Lampwork Beads For Pandora BraceletsWell, the big hole beads certainly seem to be a bit of a hit. They're now called 'Torus' beads thanks to Jo Sacker's excellent name suggestion and they sold out in minutes. Big thank you to all of you who bought them and also to those who tried to buy them but missed out. Fear not, there will be more .....

Fresh Bread
My bread turned out good! The kitchen smelt like a brewery what with the brown ale and the yeast doing their thing, but Dad seems to like the bread. Well, half a loaf has gone already so he must do!

I'm off up to Cambridge tomorrow and I won't be back until Thursday but I may well blog in between then. Have a great bank holiday weekend!

Thursday, 21 August 2008

'Violet Sunset'

Violet Sunset Lampwork BeadsDeep purple with a fabulous orangey pink, or is it a pinky orange? Nice!

I'm off to make some bread now. Dad watched The Hairy Bakers earlier in the week and seemed to fancy the idea of the brown ale and cheese bread that they made so I've got the recipe and I'm going to make it for him. Hopefully. I haven't made bread since I was fourteen!

When the bread's made I'll settle down and write some long overdue emails .....