My last tutorial was about casing a bead with a thick, magnifying layer of transparent glass. This one shows you how I encase a donut-shaped bead with a thinner layer of glass. Again, these make wonderful base beads for stringerwork or for other surface decoration. Please click here to see a video of me demonstrating this technique.
I have a Carlisle Mini CC torch and for this tutorial I'm using CiM Glacier, Vetrofond clear and a 1/16 mandrel.
Step 1
 Make a small donut-shaped bead. I tend to aim for a base bead that's about 8-9mm in diameter. You should bear in mind that your encasing glass is going to dramatically affect the finished size of your bead so always start off small. Keep your base bead warm by wafting it through the top part of the flame while you heat a gather of clear glass ready for encasing. You need to heat a glob of clear that's approximately three times the size of your base bead.
Step 2
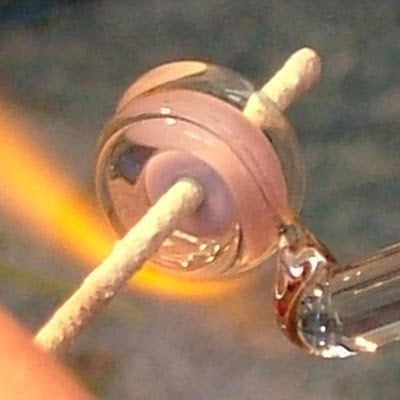
 At this point your base bead should be warm but not glowing. Once your gather of casing glass is really molten you need to press it onto the bead, pushing the molten glass so that it spreads out to cover the width of the bead. Do not touch the mandrel with the casing glass.
 As you press, turn the mandrel slowly away from you to gather the molten glass from the rod. This part is particularly tricky to describe in words so it may help if you take a look at the video (at about the 2:40 mark) to see exactly what I mean.
Step 3
 Melt your casing glass off. I usually do this on the left hand side of the bead. As you can see, I haven't gone too close to the bead hole with the casing glass.
Step 4
 Now you'll probably need to add some clear glass to the right hand side of the bead in order to even things up. Build your bead as evenly as you can and it'll save you time later on.
Step 5
 Bring your bead out of the flame to cool it down and stabilise it a bit. Then reheat the left hand edge of the bead. You want to aim the flame at the encasing. Once the glass is glowing take a Corina Magic Wand (or similar metal tool) and gently nudge the clear glass toward the bead hole. Again, don't touch the mandrel with the glass. You're just helping the glass on its way using a gentle pushing, nudging action. Now bring the bead out of the flame and let the glow in it subside.
Step 6
 Repeat the glass nudging process on the right hand side of the bead and keeping the mandrel turning and horizontal take it out of the flame to cool it slightly.
Step 7
 Once the glow has gone, put the bead back into the flame and heat it to an even glow and then round up your bead.
Step 8
 Now for a little moment of quality control. Bring the bead out of the flame and check it for any colour bleed. If you need to make the bead bigger you can add a little more casing glass then reheat and round up.
Step 9
 The finished bead all ready to be decorated.
Hints & Tips
This technique is fabulous for playing with colour. Create new shades by layering coloured transparents over opaques. For example, try amber over red for a rich warm orange, cobalt over light sky blue for a gorgeous royal blue and of course, the classic Corina combo of amethyst over periwinkle for a delicious deep purple.
Roll your base bead in frit before you encase for simple but very pretty beads. The casing adds a beautiful depth and sparkle.
Try wrapping a stringer of silvered ivory or maybe some silver wire around the base bead. Again, simple but effective.
Creation Is Messy (CiM) opaque glasses make excellent bases for encasing as they tend to be slightly stiffer. I personally love Glacier, Gelly's Sty and Dirty Martini. (And no, I'm not sponsored by CiM or anything - I just LOVE their glass!)
All images and text in this tutorial copyright © Laura Sparling 2009

 The beads for sale tonight will all be sets of earring pairs. Obviously you don't have to use them for earrings but I've taken every effort to ensure that they're the same size in case you do!